SENSORY SUPPORTS
Sensory Accommodation made easy
Everyone is born with innate needs for sensory integration or deprivation. Some people can't concentrate when they hear a lawn mower running outside, some can only fall asleep when a heavy blanket is on them at night. As our society has become more sedentary and our curriculum more rigorous, students are losing opportunities to outlet their sensory needs.
In former generations, students walked to school, rode their bikes at home, and performed outdoor chores. At present, many students unwind electronically with gaming or videos. As a result, children sometimes have difficulty regulating themselves for high stamina tasks. Underserved need can manifest in the form of hyperactivity, lethargia, impulsivity, or oppositionality.
To promote engagement and stamina, sensory resources can be used to recalibrate student attention and reprime them for learning.
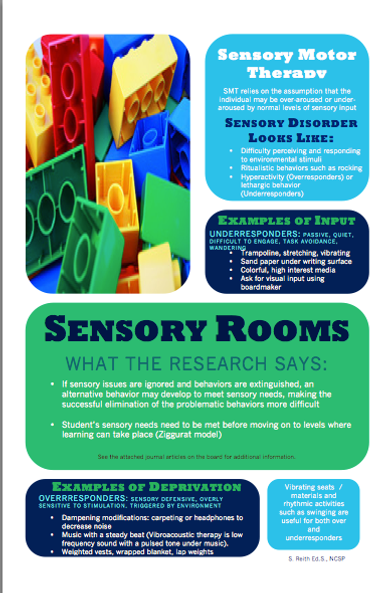
Below, find resources to start up sensory rooms, classroom spaces, or for sensory pod kits, which can be taken to any needed location.
Getting Started
Here are some considerations when starting up a sensory space:
The Basics
See the below free printable posters for the basics of sensory intervention start-up:
Videos
HTML/CSS
PHP
Click to add a language
Click to add a language
Click to add a language
Make a Sensory Room
Use the below tips and printables to construct your program:
Make a Sensory Kit
Sensory kits can be created using clear handled kits such as these and can be used in individual teacher rooms. To create one, or several for a whole-building initiative, follow these steps:
-
Print a stack of PROGRESS MONITOR FORMS for the kit and use the photos as a shopping list to purchase materials.
-
Label materials with the SENSORY ROOM LABELS.
-
Print a stack of QUIZZES and have your candidates complete them.
-
Find a quiet space in your room to use as a sensory corner or create a tent for that space.
-
Schedule your students for regular sensory breaks using a SENSORY SCHEDULE

Doing this project on your own or with a team?
Just Me
Team
How much $ can you spend?
How much time do you have?
$300+
$20-$30
An afternoon and a few minutes per day
A few days to set up, several intervals throughout the day to monitor
Which Shape did you most often choose?
Circle
Square
Create a single Sensory Pod Kit
Create a Sensory Room


Print this poster and hang it in your sensory area

Have each candidate take this quiz and circle the shapes that represent them.
Set the Rules
Click here to print the RULES POSTER. Train your students about the rules for sensory room. Be sure to walk them through and have them practice a few times. Here is a DIRECTIONS POSTER to reference daily. At the Elementary and Middle School level, we always supervise students during their sensory breaks to ensure safety and fidelity of the system. We use this DOOR SIGN to ensure privacy.
Click here to access a SENSORY QUIZ. Have each candidate for the sensory room take a quiz categorizing their sensory need. If you alert an already hyperactive and stimulated child, their behavior will worsten. The sensory room only works if you do it correctly and it is vital that students only use materials aligned with their need. Each category is assigned a shape, which then corresponds with a type of activity.
Assess
Students only need a 7 minute sensory break to recalibrate for learning

Schedule students in the room with monitors in 10 minutes intervals. Post the schedule on the door and share with teachers.
Schedule
Click here to access a sample SCHEDULE. Schedule students for breaks every seven minutes. If you are using this as a building-wide initiative, figure out if you have aide support to float in between classes. We use volunteers and student teachers to monitor our process. If you have enough people, you can usually squeeze in a few minutes for each to manage a single student a day. Post the schedule on the door and send a google doc link to teachers.

Print a stack of these progress monitors and have kids fill them out each time they take a sensory break.
Progress Monitor
Click here to print the PROGRESS MONITOR FORM. Each time your student takes a sensory break, have them fill out what they did, and how they felt before and after the session. Research shows that students only need a 7 minute sensory break to recalibrate them for learning. Afterwards, chart student data to determine whether what you are doing is working.

Print this poster and hang it in your sensory area
Set up the Room
A Sensory room can be created from inexpensive materials such as dollar store items or bean bags. Instead of purchasing expensive theraputic materials, make your own. See the "How to" poster above for ideas. Label each bin or item with the following labels.
-
Items listed in blue are calming and should be used when a student is hyperactive.
-
Items listed in red are alertiing and should be used when a student is lethargic.

Train Participants
2010 - present
2010 - present